The Oatmeal (comic) explains Net Neutrality
The Oatmeal, one of my favorite webcomics, responds to a tweet by US Senator Ted Cruz on Net Neutrality, and goes on to explain it to him.
Allereerst heel veel dank aan de Gathering of Tweakers-community, het betreffende KPN Topic, maar met name sl1000, van wie ik deze guide grotendeels heb overgenomen.
De documentatie van LEDE is heel duidelijk en geeft goed aan hoe te flashen. Hier zal ik verder niet op ingaan.
Standaard wordt er alleen maar een root-user aangemaakt in LEDE. Deze heeft standaard geen wachtwoord, dus dat is niet heel veilig. Na het flashen ga je dan naar het standaard adres van de router (http://192.168.1.1), je logt in met de root user en wijzig dan het wachtwoord in de UI.
We gaan nu er voor zorgen dat er een normale user naast komt. Maak hiervoor een SSH verbinding met de router, en log in met je net gewijzigde root-wachtwoord. Vervang in onderstaand “myuser” voor je eigen username.
opkg update
opkg install shadow-useradd
opkg install shadow-su
useradd myuser
passwd myuser
mkdir /home
mkdir /home/myuser
chown myuser /home/myuser
vi /etc/passwd
myuser:x:1000:1000:myuser:/home/myuser:/bin/ash
opkg install kmod-bridge # Not needed on OpenWRT 18.06
opkg install igmpproxy
Configureer de switch zodat de juiste VLANs (Network -> Switch) gekoppeld zijn, dit moet er ongeveer zo uitzien:
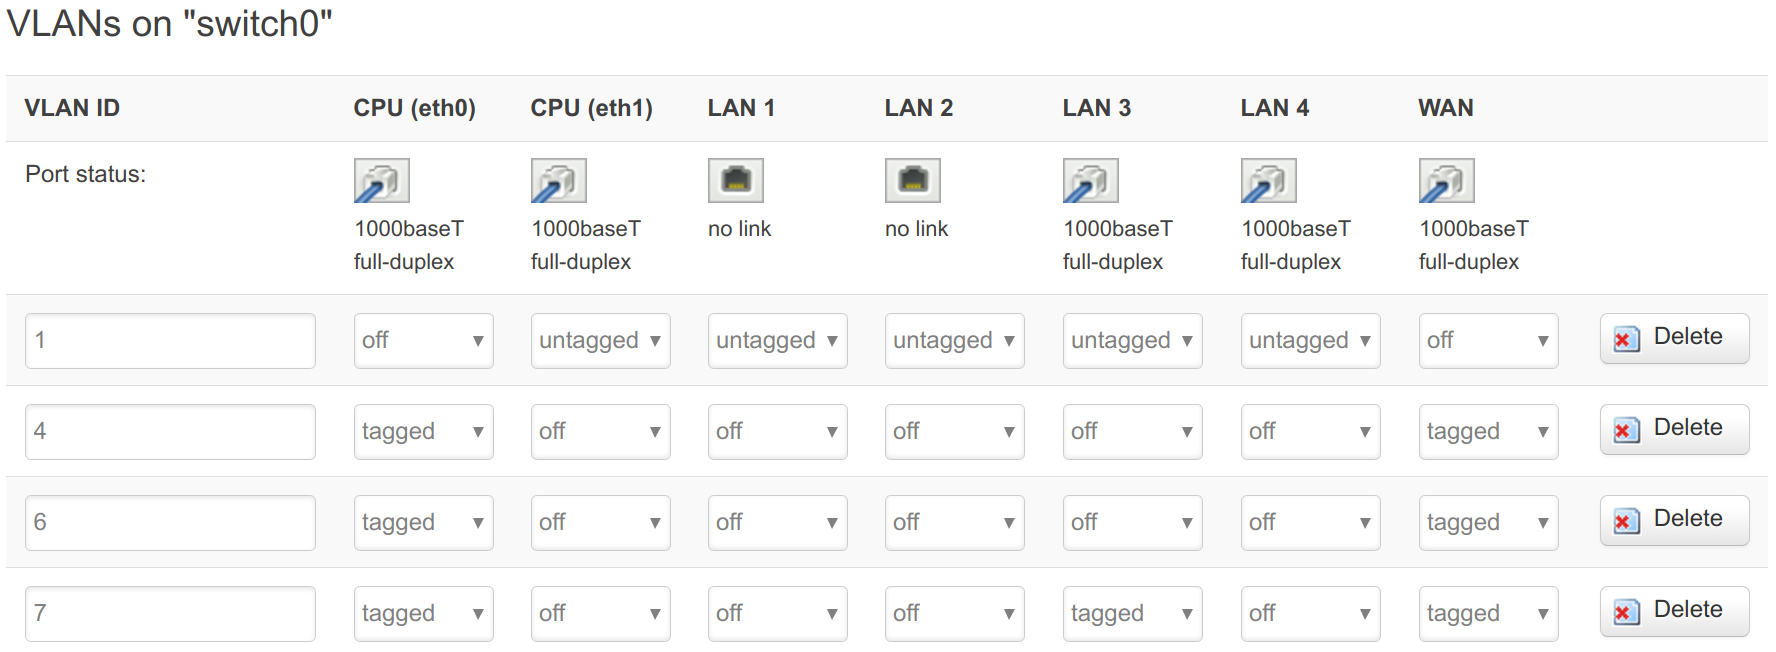
Let er hierbij op dat LAN-poort 3 nu de poort is waar de ExperiaBox op aangesloten wordt voor telefonie.
By default, de ifname (interface name) van de WAN interface is “eth0”, op de R7800. Op jouw router kan dit anders zijn, kijk hiervoor in /etc/config/network. Noteer de ifname.
Voer nu het volgende commando uit en noteer het MAC-adres.
ifconfig eth0
Open /etc/config/network weer en pas de entries voor de WAN-interface aan, zodat het er uitziet zoals hieronder:
config interface 'wan'
    option ifname 'eth0.6'  #Voeg dus .6 toe, dit zorgt er voor dat de interface aan vlan 6 gekoppeld wordt
    option proto 'pppoe'    #KPN gebruikt pppoe als dail-up protocol
    option username 'MA-CA-DD-RE-SS-00@direct-adsl' #vul hier het mac-adres in van de wan interface
    option password 'kpn'   #dit wachtwoord schijnt van alles te mogen zijn, maar 'kpn' werkt
    option ipv6 '1'         #zodra kpn IPV6 uitrolt wil ik dit kunnen gebruiken, daarom schakel ik IPV6 in
    option peerdns '0'      #ik wil mijn eigen DNS servers gebruiken, dus negeer de DNS servers die de ISP aanlevert
    option dns '8.8.8.8 8.8.4.4 31.220.43.191 62.141.38.230' # en dat zijn in dit geval deze DNS servers (resp 2x Google en 2x OpenDNS), pas aan naar eigen voorkeur
Voeg nu de IPTV interface toe:
config interface 'IPTV_WAN' #of kies zelf een leuke naam :)
    option proto 'dhcp'
    option ifname 'eth0.4' #0.4 dus vlan 4
    option delegate '0'
    option defaultroute '0' # geen default route
    option peerdns '0' # geen DNS gebruiken die je mogelijk krijgt aangeboden op deze interface
    option vendorid 'IPTV_RG' #vendorid meegeven bij de dhcp aanvraag (vereist, anders krijg je geen IP)
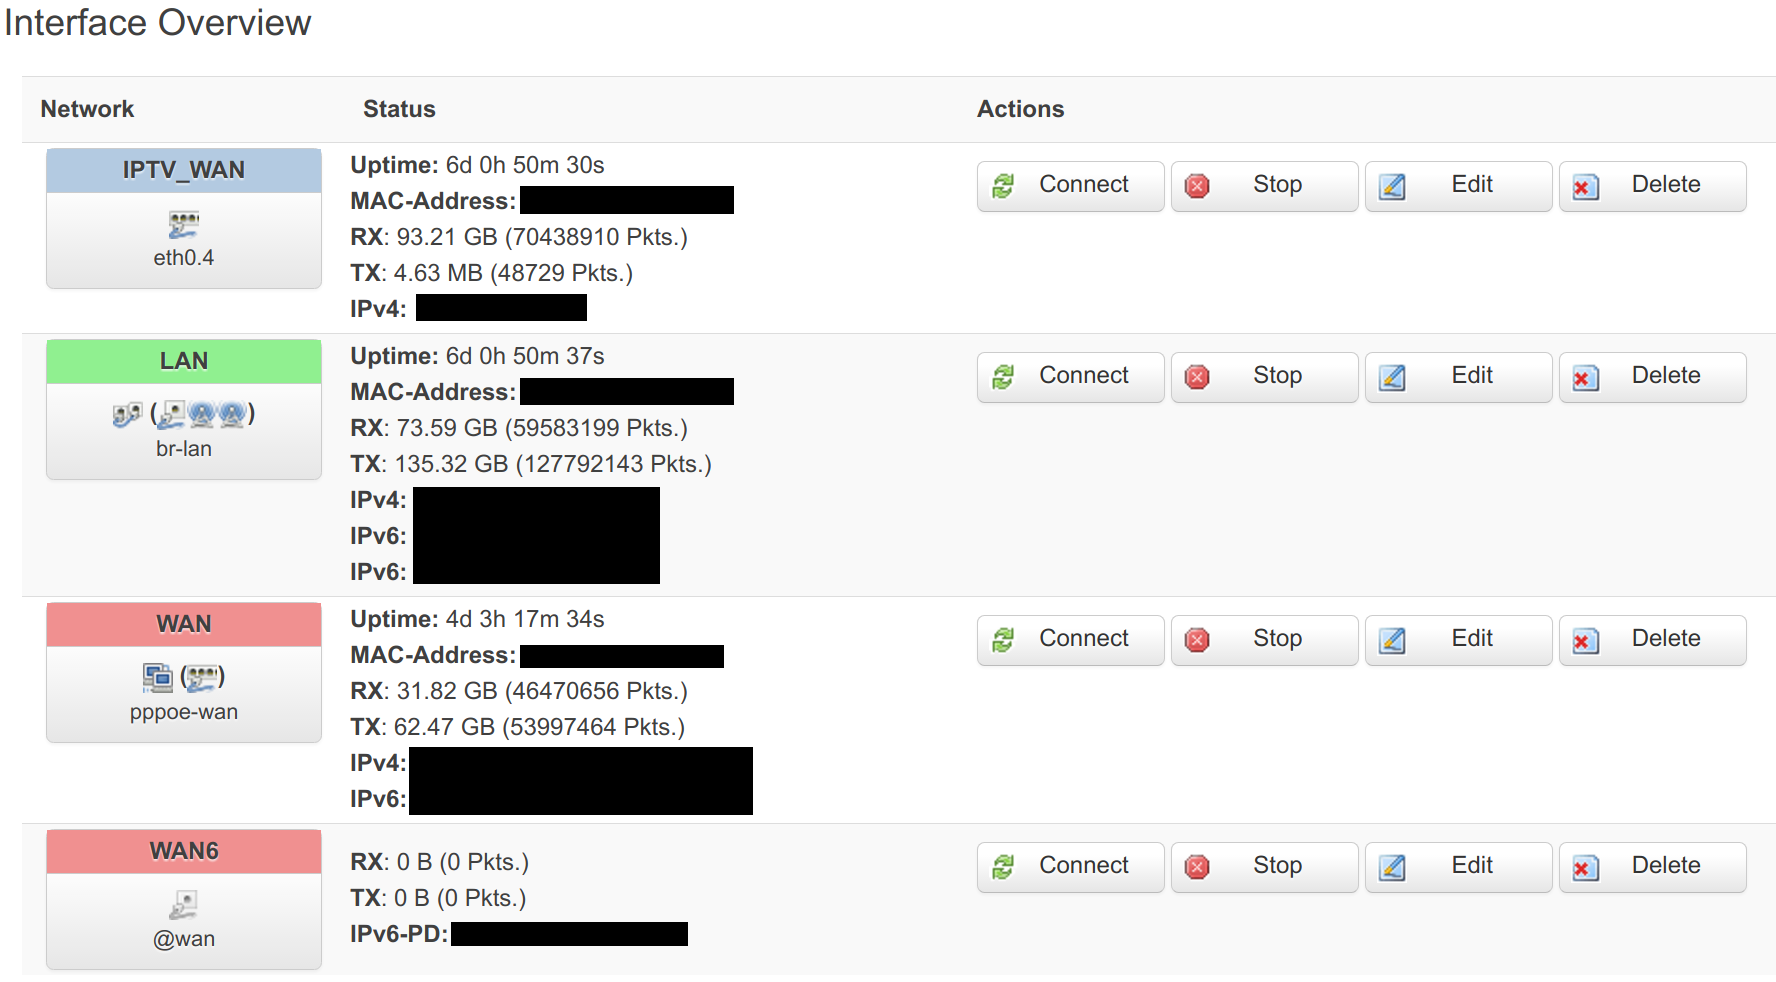
In de User Interface (Network –> Interfaces), ziet dit er zo uit:
Om de configuratie actief te krijgen, rebooten we de router.
reboot
Nu kunnen we de router direct aan het internet hangen. Koppel dus de ExperiaBox af en prik het draadje in de WAN-poort van je router.
Draai ‘route’, je krijgt een lijstje met actieve routes van de router te zien. Dit ziet er uit als onderstaand:
Kernel IP routing table
Destination     Gateway          Genmask           Flags  Metric  Ref  Use  Iface
default         static.kpn.net   0.0.0.0           UG     0        0   0    pppoe-wan
10.81.80.0      *                255.255.248.0     U      0        0   0    eth0.4
10.81.80.1      *                255.255.255.255   UH     0        0   0    eth0.4
192.168.2.0     *                255.255.255.0     U      0        0   0    br-lan
195.190.228.20  *                255.255.255.255   UH     0        0   0    pppoe-wan
213.75.112.0    10.81.80.1       255.255.248.0     UG     0        0   0    eth0.4
Als alles correct werkt zie je in de lijst voor eth0.4 twee soortgelijke entries (ipadressen zullen anders zijn):
Destination     Gateway          Genmask           Flags  Metric  Ref  Use  Iface
10.81.80.0      *                255.255.248.0     U      0        0   0    eth0.4
10.81.80.1      *                255.255.255.255   UH     0        0   0    eth0.4
Noteer het destination adres wat getoond wordt, in plaats van de 10.81.80.1
Open /etc/config/network en voeg het volgende toe:
config route
    option interface 'IPTV_WAN' # Gebruik hier uiteraard de naam die je hebt opgegeven voor deze interface
    option target '213.75.112.0/21' # met dank aan pogostokje voor deze waarde
    option gateway '10.81.80.1' # dit adres is dus afhankelijk van wat je hierboven genoteerd hebt
In de User Interface, ziet dit er zo uit:

Open /etc/dnsmasq.conf en voeg het volgende toe:
dhcp-option=60,IPTV_RG
dhcp-option=28,192.168.1.255 #dit is het broadcast adres van je interne lan, pas deze aan naar je eigen situatie)
Open /etc/config/igmpproxy en zorg ervoor dat deze er uit ziet zoals onderstaand
config igmpproxy
        option quickleave 1

config phyint IPTV_WAN               # Gebruik hier weer de naam overeenkomstig met de configuratie in /etc/config/network
        option network IPTV_WAN      # Gebruik hier weer de naam overeenkomstig met de configuratie in /etc/config/network
        option direction upstream
        list altnet 192.168.2.0/24   # Pas dit aan naar jouw situatie
        list altnet 217.166.0.0/16
        list altnet 213.75.0.0/16

config phyint lan
        option network lan
        option direction downstream
Open /etc/config/firewall en voeg de volgende regels aan het einde toe:
config zone
        option name 'IPTV_WAN'
        option input 'ACCEPT'
        option forward 'REJECT'
        option output 'ACCEPT'
        option network 'IPTV_WAN'
        option masq '1'

config forwarding
    option dest 'IPTV_WAN'
    option src 'lan'

config rule
    option name 'Allow-IGMP-Proxy'
    option proto 'udp'
    option family 'ipv4'
    option target 'ACCEPT'
    option dest_ip '224.0.0.0/4'
    option dest 'lan'
    option src 'IPTV_WAN'
Dit zorgt er voor dat:
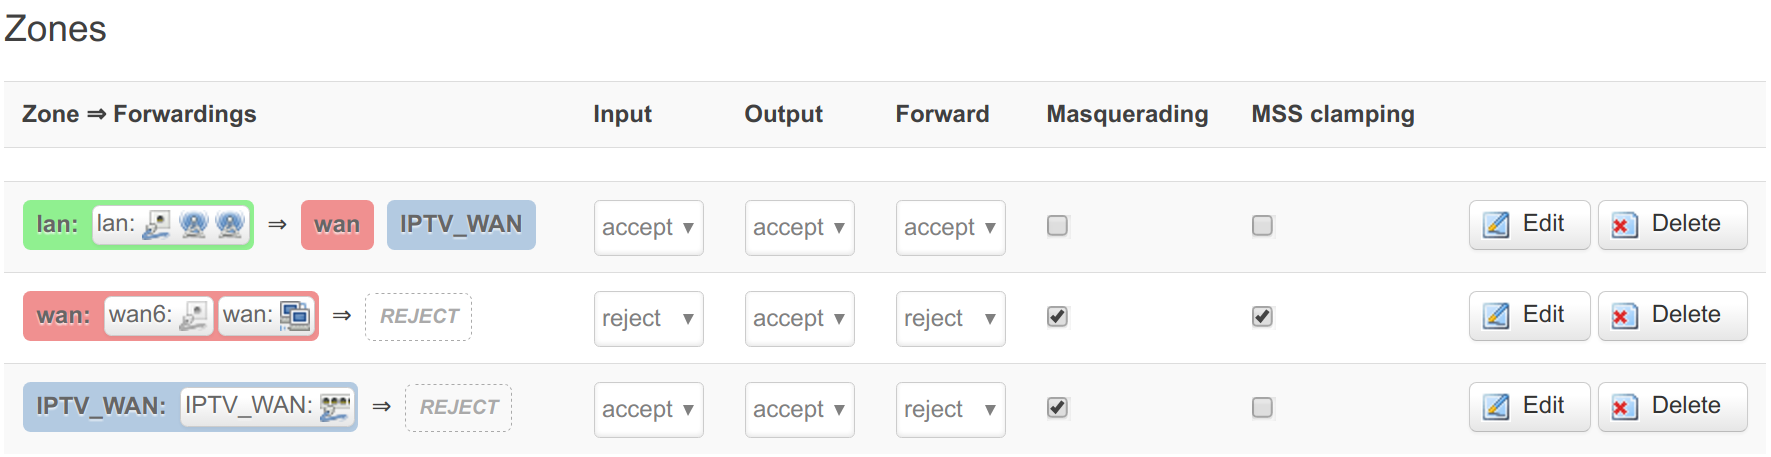
In de user interface (Network –> Firewall –> General Settings), zou dat er zo uit moeten komen te zien:
En zo voor de Traffic Rule (Network –> Firewall –> Traffic Rules)

Reboot nogmaals de router. Nadat de router is gereboot, zet je je IPTV Kastje aan en test je of het werkt (wat wel zou moeten).
Je hebt nu Routed IPTV, wat betekent dat je ook zaken als NetFlix zou moeten kunnen bekijken via het kastje van KPN.
2018-12-20
On February 5th, I received my new laptop, a Dell XPS 15 9550. Before this laptop, I used to use a Dell Precision M3800, which has been replaced by the Dell Precision 15 5000 series, but the “only” difference between the two is the dedicated video card you can choose. The Precision sports a Quadro video card, whereas the XPS uses a GeForce card. Without going in too much details, this means that the Precision is better in professional work, such as AutoCAD, and the XPS is better at running games. Since one of my goals with this laptop was to get rid of my desktop PC, which I only use for games, the XPS was the more logical choice.
As can be derived from previous posts, I mainly use Linux, more specifically Fedora, on my laptop. This is because I run a number of VM’s (via VirtualBox and Vagrant) and/or Docker containers at the same time. In itself, this is also possible on Windows, but on Linux the overhead is a lot lower than on Windows. I will not go into the details of how to use aforementioned tools, that is something for a different post.
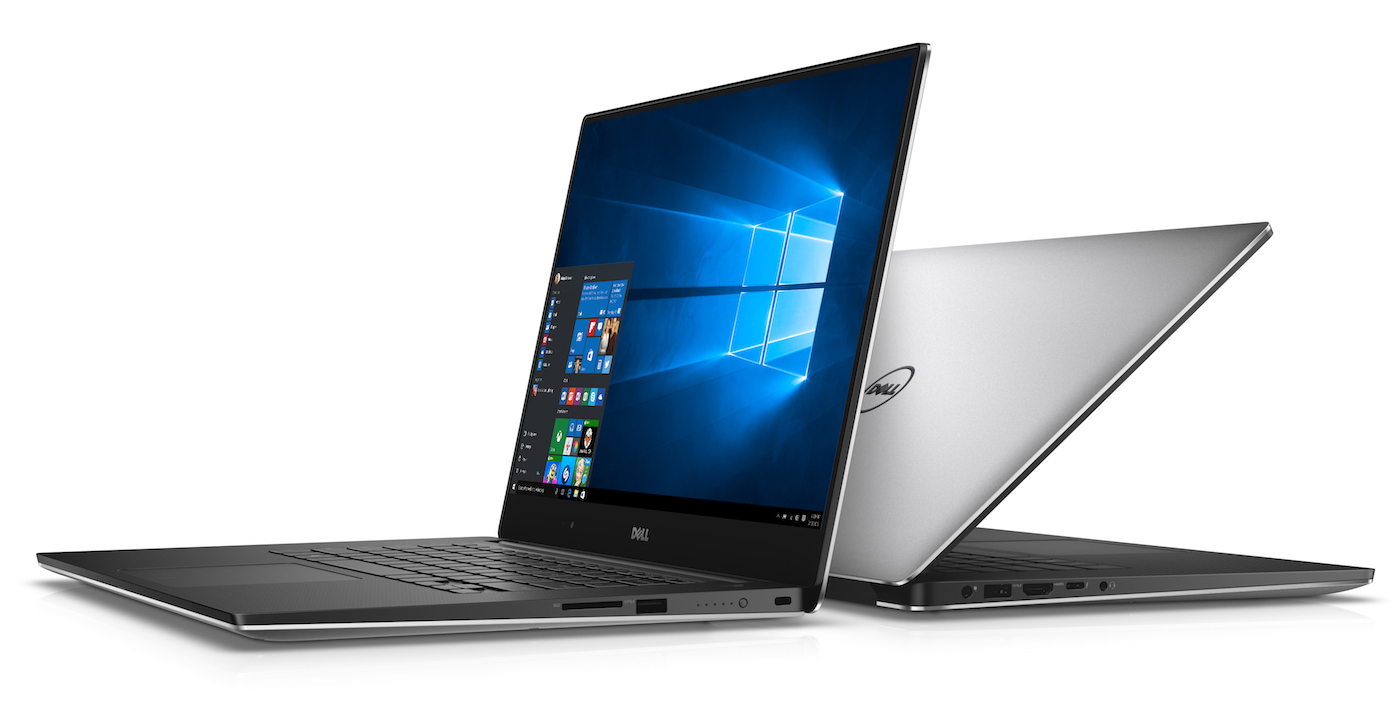
Dell XPS 15
What I will go into in this post, as the title might suggest, is how to get Fedora 23 running on the XPS 15, how to dual-boot it with Windows, issues I have run into, and their solutions (hopefully). Also, be sure to read the end (last two paragraphs) of the post, which contain an important note :). I hope this post will help people who want to use Fedora on their XPS, and maybe I will even get a few tips and pointers in return :).
For reference purposes, the specs are:
![]() Working in IT, it is often useful to be able to test software and try out stuff in a clean environment, to make sure you do not, inadvertently, destroy your work-laptop. Personally, I have been using VirtualBox for this for quite some time. However, one of my friends, and co-worker, (hi Maarten!) has been nagging me continuously over the past year about why I am still using VirtualBox and why I would not switch to KVM. Especially since I am running Fedora on my laptop, his argument is that using the de facto built-in way for virtualization on Linux is better (and faster) than using VirtualBox, which, admittedly, does have its quirks. Annoyingly, performance comparisons over time, seem to support his claim.
Working in IT, it is often useful to be able to test software and try out stuff in a clean environment, to make sure you do not, inadvertently, destroy your work-laptop. Personally, I have been using VirtualBox for this for quite some time. However, one of my friends, and co-worker, (hi Maarten!) has been nagging me continuously over the past year about why I am still using VirtualBox and why I would not switch to KVM. Especially since I am running Fedora on my laptop, his argument is that using the de facto built-in way for virtualization on Linux is better (and faster) than using VirtualBox, which, admittedly, does have its quirks. Annoyingly, performance comparisons over time, seem to support his claim.
So, after trying KVM out a few times, reluctantly and not really open-minded, and failing in accomplishing what I want, I thought it was time to go ahead and REALLY figure out what is holding me back from using KVM, and if I would be able to switch from VirtualBox to KVM as my go-to virtualization software. Also, it makes for blog-post, which is always a good thing 🙂
As is the case with any kind of switch like this, it is important to define what my requirements are for the virtual machine provider, and of course, as it is a comparison, I will be comparing everything KVM does to VirtualBox, for better or worse. I might even put in some screenshots here and there.
 Some time ago, I had a post that showed a Youtube video from Last Week Tonight, in which John Oliver explained Net Neutrality in the best way possible.
This time, I would like to share a video about Government Surveillance. In the video, apart from the expected joking about, John Oliver tells us that the Patriot Act will be due for reauthorization on June 1st of this year. In the Patriot Act, there is a section, 215, also called the library records section, that grants the U.S. government the power to ask for tangible things in its fight against terrorism. It has been set up in such a broad way, that it is basically a blank check. Now, I will not go further into explaining this, as the video does a much better job at this.
There are two lessons to be learned from the video. One is that a lot of people have “forgotten” about who Edward Snowden is, and the things he brought to light. Some people even thought he was Julian Assange, the founder of Wikileaks, which is not a good thing.
However, the most important lesson to be learned from this, and one that is put forward in the video as well, is that most people cannot actually grasp the concept of how far-reaching the NSA programs were. This is especially if you try to explain it to them in the “techy” language that is inherent to the discussion. However, once you simplify the discussion, and put it into a context people can relate to, they are a lot more susceptible to the problem at hand.
Have a look at the video after the break and see for yourself.

Original Image: CloudTweaks.com – http://cloudtweaks.com/2011/08/the-lighter-side-of-the-cloud-the-migration-strategy/
As described in The Big Migration – Consolidating my accounts – Preparation, I am moving my @gmail account to my @gapps account. The main reason is to provide me with only one account to sign in to.
Just to refresh everyone’s memory, here is the list of stuff that I want to transfer:
Google Tools:
Connected Tools:
 As described in“The ancient way” – or why I am still using Thunderbird for mail, I am still using a client, Thunderbird, to access my Gmail accounts. This has both its advantages and disadvantages, an example of the latter being that I am always dependent on a connection to my server (in the setup that I am running, which is not optimal, to say the least).
One of the reasons why I have not yet moved to the online model, is that I like having an overview of everything in one view, something that Thunderbird provides me with. However, this is also possible in Gmail, if you set up some forwarding and import rules, so basically, consolidating everything into one account.
This has the added advantage that Google Now (which I use a lot) will be able to also show me information on orders that I placed at stores, travel details, and so on.
Unfortunately, there is no button to press to get everything done magically, so I will have to manually move everything from my Gmail account (@gmail) to my Google Apps account (@gapps). Then again: maybe there are tools that I can use. Let us dive a bit deeper.
 In the olden days, when one was looking for an email client, you either ended up with Outlook Express (as it was included with Windows) or Outlook, as it was included in pretty much all Office versions.
Back in those days, pretty much all email you received in your client would be transferred via POP, or the Post Office Protocol. As user mailboxes were not that big at the time, I believe it was 20MB at most ISPs in the Netherlands, POP would download your mail into your client and then delete it from the server.
When the first free email providers started, Hotmail (which apparently started with only 2MB) and Yahoo! Mail, you started to get the ability to save more and more mails in your mailbox, but occasionally, you would still have to delete items to free up space. It must be mentioned, that emails back then were also a lot smaller than the ones we have now.
When Gmail was first launched, in 2004, it provided users with a whopping 1GB of mail. Hotmail and Yahoo followed suit and also started offering more storage space.
 There are many online tools these days, which you can use for just about anything. Apart from the usual suspects, like Facebook, Twitter and Google (of which the first two are not necessarily tools), there are a number of other tools, which aim to increase your productivity. I have mentioned a number of these in another post, To cloud or not to cloud. Of course, not all tools mentioned there are ones that I use.
As you start looking around to improve your own productivity, you start to try tools, and stick with them, or not. At the moment, the tools I use most extensively are Evernote, Wunderlist, Trello, Google Calendar, and Dropbox.
I think that I have written enough about Evernote, but for this article, let’s just keep it at that I use it as my digital filing cabinet. Wunderlist is a to-do-list app, which you can use to keep track of your to-do’s and share them with others as well. Trello is more of a project management application, based on a Kanban Board, I am using it to see if it useful for planning projects. Google Calendar, well, that is basically what the name says: a calendar. It has my appointments in it, and such, which is what it is made for. Dropbox is well-known, I would assume, but just in case someone does not know it yet, it is a file-syncing service, which puts your files in the cloud and makes them (readily) available on every device you have installed Dropbox on. (more…)